|
SCORE AND GRAPH INTERPRETATION Profiler provides a detailed graphic analysis of how well each student performed during the tests. The following explanation will help you to interpret this information so you can get the most from your experience with Profiler. 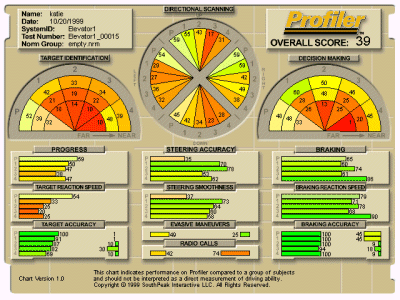
Click on an area of the chart to view information about that section.
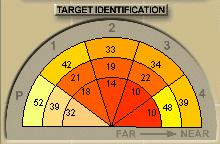
1. Data and Norms Group The box in the upper left corner contains your Name, the Date you took the test, the File name of your score file, and the name of the Norm Group against which your performance was measured.  Profiler uses the Norm Group as the basis for your score. A norm group is a collection of test data gathered from other drivers, which is used as a yardstick to rate your test performance. If the norm group is "Your Company," your performance is rated against drivers who have taken the test in "Your Company." If the Norm Group is "National Norms," your performance is measured against a national cross-section of drivers who have tested on Profiler. 2. Overall Score and Percentiles Your Overall Score on Profiler appears under the logo in the upper right corner.  The Overall Score is calculated from all the skill areas that Profiler rates during a test. Profiler presents your overall score as a percentile. This percentile is your standing relative to other drivers in your Norm Group. For example, if your Overall Score is 68, you rank in the 68th percentile of drivers in your norm group, meaning that you performed better than 68 percent of the drivers in the group. All scores for the individual skill-area components are also percentile rankings. Profiler provides a series of charts that identify each skill-area component of your overall score. The skill ratings are color-coded. Green scores indicate above-average performance for the norm group. Yellow ratings indicate average performance. Orange or red ratings indicate below-average performance in skill areas that may need work. The chart for each skill-area has four scores, labeled P, 1, 2, 3 and 4. These scores correspond to your performance in the practice lap and on test levels 1 through 4. By displaying your skills over each of the five levels, Profiler lets you observe how your performance changes as the test becomes more difficult. To understand how to improve your Overall Score, you will need to examine specific skills in the following sections. 3. Target Identification The target identification scores on the left side of the page rate your ability to spot visual cues in three general areas of your field of vision, from far to near.
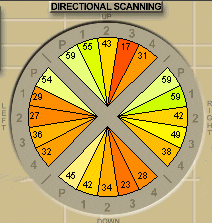
Your two-dimensional computer screen represents a three-dimensional driving view. In this "flattened" perspective, objects toward the center of the screen correspond to objects in the distance, whereas objects at the edge of the screen correspond to closer objects that rapidly zip past in your peripheral vision. High scores in the "far" area indicate that you are a driver who pays attention to details "down the road" before they become critical. Looking ahead during Profiler (and while on the road) is an important skill practiced by good drivers. High scores in the medium and near ranges indicate that you respond well and quickly to sudden unexpected visual cues. Keep in mind that these scores are percentile rankings. Their significance is wholly dependent on the norm group against which you are being ranked. 4. Directional Scanning The "Directional Scanning" circle in the center of the page rates your performance in attending to all areas of your visual field (the computer screen).
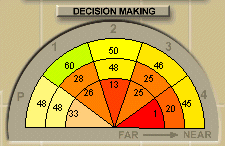
The four scanning directions represent the four directions where visual cues appear: up, right, down, and left. Your score for each direction is presented as a percentile: the number in each colored segment represents your score relative to other individuals in your Norm Group. If your scores are low in a particular direction, you can consciously focus on events in that direction when you drive Profiler again. Some individuals have clear directional deficits that can be corrected by practice. If you've had an accident in the last 3 years, was it from the direction in which your Directional Scanning Scores were the lowest? 5. Decision Making The Decision Making scores on the right side of the page are a rating of how well you attend to more than one thing at a time.
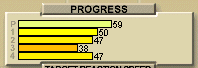
If you recall, the P lap has relatively few things happening at the same time, while level 4 is hectic! If your decision scores are high in the "far" segment of the display (the center), you are able to see things in advance and to respond to many things at once. If your decision scores are low relative to the others in your group, you might be experiencing tunnel vision. Tunnel vision often occurs when one is agitated or nervous about driving or piloting. This will improve if you are calmer when you drive. As any professional driver will tell you, one way to relax and to reduce target fixation (tunneling) is through practice. 6. Progress Through Profiler Levels You can observe your progress through the practice lap and each of the 4 levels in the "Progress" box in the lower left quadrant of the display.
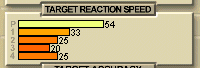
The Progress scores over all 5 levels reflect BOTH accuracy and speed of spotting new targets. 7. Target Reaction Speed The Target Reaction Speed box contains scores that rate the speed with which you reacted to visual cues (other than the brake light), relative to others in your norm group.
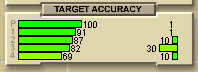
8. Target Accuracy The final box on the left shows your Target Accuracy scores.
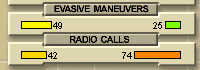
The bars on the left show how accurately you responded to visual cues in all parts of the screen. The bars on the right show how many times you clicked the paddles when events were not there. If the scores on the right are high, you are pressing the paddles too often. 9. Steering The boxes in the center of the display show your steering scores. 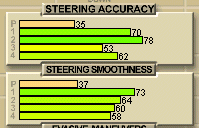 The Steering Accuracy scores rate your ability to keep your car centered on the road or in your lane. If this score is low, you may be over-steering or not steering enough. The Steering Smoothness scores rate how smoothly you steered. Low scores in this area indicate your steering is too jerky. If your scores are high, you have good eye-hand control. 10. Evasive Maneuvers and Radio Calls The Evasive Maneuvers score rates your skill in evading oncoming vehicles in your lane. The bar on the left shows your Evasion Score, while the bar on the right shows how often you crashed into oncoming vehicles.
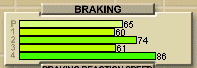
The Radio Calls score rates your accuracy at answering calls to your unit. The bar on the left reflects the calls to your unit that you answered. The bar on the right reflects responses to non-events, when you pushed the radio button without being called. 11. Braking The score bars in three boxes on the right bottom of the page rate how well you responded to the brake lights on the car in front of you. The first scores represent BOTH the overall accuracy and speed of braking.
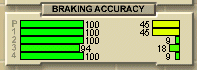
The second box rates your reaction speed to the brake lights. These speeds are generally slower than your Target Reaction Speeds because they involve the large muscle groups in your leg. 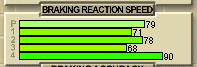 The Braking Accuracy scores rate how accurately you responded to the brake lights. The bar chart on the left reflects your performance responding to the brake lights. The bar chart on the right indicates how many times you pressed the brake pedal when there was no brake light on the car in front of you.
If
your braking scores are high, but your scanning and decision scores are
low, you are likely fixating on the brake light. The next time you drive
Profiler, try to make the brake the secondary task, and pay more attention
to events in all areas of the screen. Experienced and professional drivers
find that braking and lane control become almost automatic, so they can
reserve visual and thinking resources for avoiding trouble spots on the
road.
|