|
BASIC OPERATING INSTRUCTIONS FOR STUDENTS WAYS TO IMPROVE STUDENTS' SKILLS
As an objective measurement of your students abilities and progress, Profiler can enhance your training program by helping you determine where to apply your training resources, and validate the effectiveness of your program. At a minimum, we recommend that each student take one Profiler test at the beginning of the course, to establish a baseline for measuring progress, and once after training is complete to evaluate improvements. Since Profiler can be self-administered, it is not necessary to devote instructor time to each student being tested. Profiler testing can also be accomplished while students are waiting for access to other specific training activities, such as track or simulator sessions. As
a remedial tool, Profiler can be used to help improve reaction, scanning
or multitasking problems, again without requiring devoted time from the
instructor. Students receive automatic evaluations, and scores can
be analysed and tracked later by the instructor.
BASIC OPERATING INSTRUCTIONS FOR STUDENTS 1. Launch the program by double-clicking on the Profiler shortcut icon on your desktop. (The Profiler CD-ROM is not needed to run the program once it has been installed.) 2. Click "Play". 3. The mouse cursor appears as an ignition key. Click the "Drive" button. 4. A log-on dialog box appears. The student will be prompted to enter first name, middle initial and last name. 5. The first time students log on to Profiler they are prompted to "Please Answer A Few Questions About Yourself," such as age, gender and height. Subsequently, the log-on dialog box gives the option to edit this information or to proceed to the test. 6. An introductory video plays, explaining the purpose and value of the Profiler test. Students must respond appropriately to the narrator's prompts for familiarizing themselves with the controls in order for the introduction to proceed. The Escape key (Esc) skips this introductory sequence. 7.
The Profiler narrator gives students test instructions at the beginning
of the practice lap:
8.
In more advanced laps, the narrator adds to the instructions:
9. The narrator guides students through four increasingly challenging and complex test laps. 10. After the last lap, the student may be prompted to decide whether to score the test or to exit the test without scoring. 11. The narrator provides a breakdown of the student's performance on the test. 12. A printable Profiler score and detailed test results completes the test. 13.
When you click Print, the Profiler screen will iconify to the task bar.
Allow printing to complete, then press the Enter key or click on the Profiler
popup on the task bar to restore Profiler for the next test.. On slower
systems, wait until printing
14.
If it becomes necessary to exit the test at any time, press alt+F4. This
will result in the loss of test data, so should only be used if problems
occur.
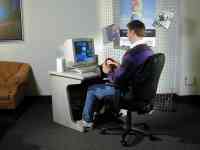
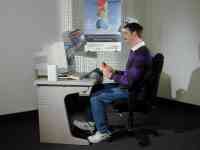
PROPER TEST LAB SET-UP The objective is to simulate an effective driving environment as nearly as possible. 1. Each student should be seated comfortably and upright with the monitor at eye level at a distance between 18 and 24 inches (about an arm's length).
2. Driving pedals should be placed securely on the floor so that the student can activate the brake with legs extended at slightly more than a right angle. Measures should be taken to secure the pedals in place, if slippage is likely.
3. Students should hold the steering wheel with both hands, keeping elbows bent and loose. 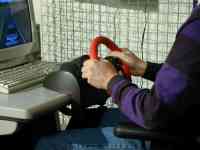 TEST ADMINISTRATION 1. Verify that all students employ the position and posture detailed above. 2. Prompt students, if necessary, through the BASIC OPERATING INSTRUCTIONS above. 3. It is recommended that the instructor administer one baseline Profiler test to the entire class. Scores can be printed at the completion of each test or retained by the instructor for later analysis. The baseline data can be used to illustrate improvement or to begin a risk analysis. 4. On analyzing test results, the instructor may wish to schedule time to work with those students whose results indicate significant weaknesses. WAYS TO IMPROVE STUDENTS' SKILLS 1. Take the Profiler test. 2. Analyze, explain and discuss test results to identify strengths and to target trouble areas. 3. Apply lessons drawn from Profiler to on-the-road or test-track practice. 4. Repeat the Profiler test often to track and reinforce progressive improvement. TIPS TO ENSURE TEST VALIDITY 1. Maintain a comfortable but alert posture, both hands on the steering wheel, elbows relaxed and bent, monitor at eye level within an arm's length. 2. Do not hug the steering wheel. 3. Leaning too close to the monitor will make the test harder, as this effectively widens the field of view. 4. Leaning far back from the monitor will skew test results, as this effectively narrows the field of view, reducing the scanning area. |
||